XDS Consumer Icons and Screens
Introduction
XDS Consumer operates in two modes, synchronized and non-synchronized. See XDS Consumer Overview.
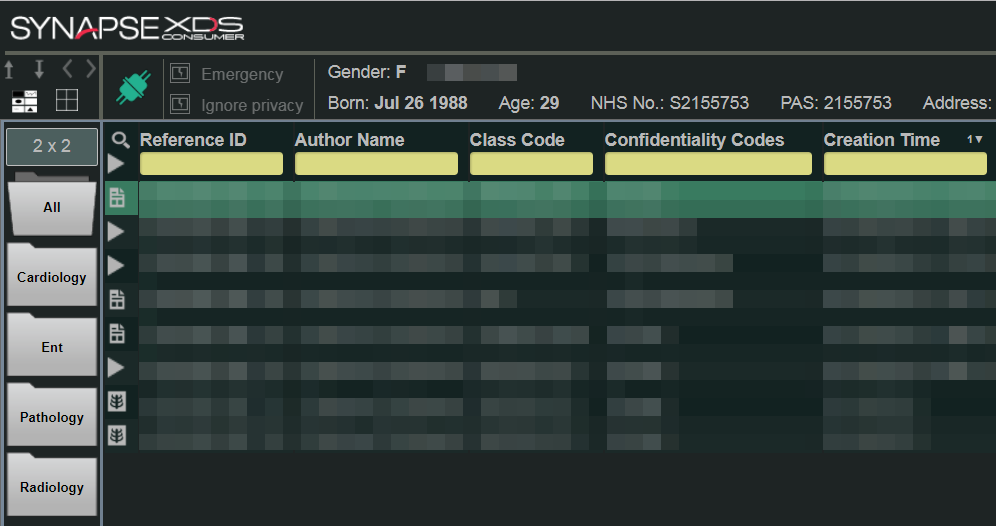
- Synchronized patient mode opens to the patient’s record list.
- Once you open a patient record in the Synapse Viewer, the patient record list for that specific patient displays.
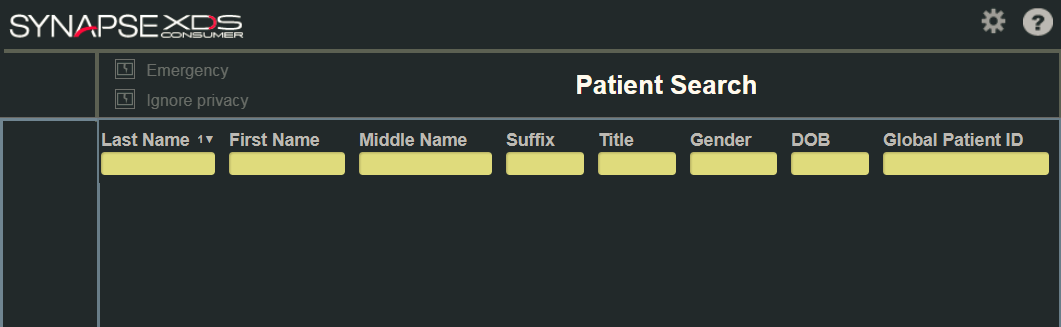
- Non-synchronized patient mode displays the patient search page.
- In non-synchronized mode, you will search to locate the patient. When you click to open the resulting patient, the record list for that patient displays.
Non-Synchronized Patient Mode Screen
Synchronized Patient Mode Screen
|
Icon |
Description |
|---|---|
|
|
Click to display the domain options. |
|
|
Click to display the help guide. |
|
|
Non-synchronized Patient Mode icon. Indicates that Synapse and XDS are not synchronized. |
|
|
Synchronized Patient Mode icon. Indicates that Synapse and XDS are synchronized. |
|
|
Unable to Synchronize icon. Indicates that Synapse is unable to synchronize with XDS. |
|
|
Indicates that the patient might have more documents that are currently unavailable. |
|
|
When selected, Emergency event codes are triggered for record access. |
|
|
When selected, the Basic Patient Privacy Consent (BPPC) check does not occur and all records for the patient display regardless of consent. |
|
|
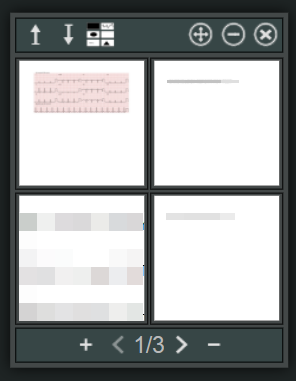
Click Upcount View to view selected records. The Upcount View performs different actions depending on your view.
|
|
|
Click the Record List icon to return to record list view when in XDS Tile View. If a record list contains multiple records:
|
|
|
Click to display all records for the selected patient that are grouped by specialty. |
|
|
Click to close the specialty folder or filter out records for a patient with this specialty. |
|
|
Indicates that the record is either a report, PDF, or other type of document. |
|
|
Indicates that the record is a DICOM image. |
|
|
Click to save the XDS Tile View layout. |
|
|
Click to load the saved XDS Tile View layout. |
|
|
Click to go to the previous view state |
|
|
Click to go to the next view state |
|
|
Click Composer to define a custom tile view. |
|
|
Click Upcount to change the upcount. |
|
|
Click Search to conduct a cross-search. This functionality is only available in the record list view screens. |
|
|
Click to return to the record list when in XDS Tile View. |
|
|
Indicates that a DICOM image non-displayable. |
|
|
Indicates that a DICOM image failed to load. |
|
|
Indicates that a document failed to load. |


 next to the first record to display records with the same Reference ID.
  to collapse patient records.


Composer
|
Composer Icons |
Description |
|---|---|

|
Click to load the records that currently display in the XDS Tile View or the record list view in to the Composer. This will allow you to drag and drop and rearrange these records to create a custom layout for the records. |

|
Click to display the Composer records in the XDS Tile View view. |
|
|
Click Composer to select a custom upcount. |

|
Click to move the Composer around the screen. |

|
Click to close the Composer and removes the content. |

|
Click to add new page to the Composer. |

|
Click to remove current page from the Composer. |
|
|
Click to go to the previous page in the Composer. |
|
|
Click to go to the next page in the Composer. |

