Using Series Selection Menu
Introduction
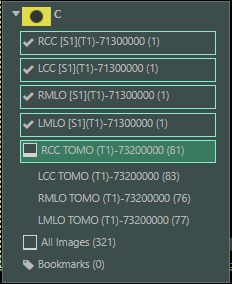
Synapse populates the Series Selection Menu (SSM) with the names of current and comparison series from the automatic or manual comparison operations. If you add a new comparison, Synapse adds the series names from the study to the SSM. If no comparison studies are available, the SSM only lists the series for the selected study.
|
To make it easier to find a series, Synapse groups all studies in current and prior drop-down lists using the study icons. Synapse displays the study indicators (C, P1, P2, and so on) next to the study icons. |
Steps
- Do one of the following:
If...
Do this...
The viewport is empty.
Right-click the viewport. Synapse displays a list of available series.
The viewport is not empty.
Click or hover over the series name. Synapse displays a list of available series.
- Click the series you want to display in the viewport.
|
Note: |
|
Example
|
For the current study, the Series Selection Menu (SSM) indicates whether you have viewed all the images in a series:
|
Results
Synapse displays the selected series in the viewport.